WPF を勉強してみるⅡ
WPF は見た目だっ!と意気込んで、レイアウトコンポーネントを色々触ってみた。
とりあえず触ったのは以下の連中
- Grid
- UniformGrid
- Canvas
- StackPanel
- WrapPanel
- DockPanel
Grid
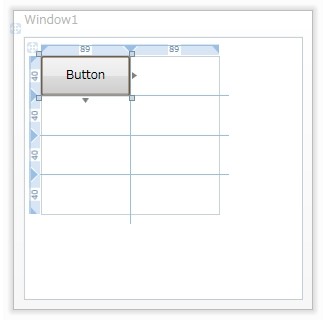
グリッドレイアウトとは良く言ったもの。
線を引くようにレイアウト配置を決めるもの。
プロパティの、「ColumnDefinition」と「RowDefinition」で区切れる。
(画面はサンプル)

サンプルコード
<Window x:Class="WpfSample2.Window1"
    xmlns="http://schemas.microsoft.com/winfx/2006/xaml/presentation"
    xmlns:x="http://schemas.microsoft.com/winfx/2006/xaml"
    Title="Window1" Height="300" Width="300">
    <Grid>
        <Grid Margin="17,19,83,85" Name="grid1">
            <Grid.RowDefinitions>
                <RowDefinition />
                <RowDefinition />
                <RowDefinition />
                <RowDefinition />
            </Grid.RowDefinitions>
            <Grid.ColumnDefinitions>
                <ColumnDefinition />
                <ColumnDefinition />
            </Grid.ColumnDefinitions>
            <Button Name="button1">Button</Button>
        </Grid>
    </Grid>
</Window>
UniformGrid
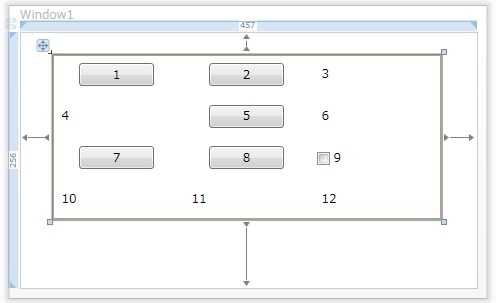
上記と同じくグリッドレイアウト。
コントロールを等間隔に配置できるもの。
配置の間隔は自動調整。
始めに「Rows , Columns」の2つのプロパティで、領域の等分を決めておく。

<Window x:Class="WpfSample2.Window1"
    xmlns="http://schemas.microsoft.com/winfx/2006/xaml/presentation"
    xmlns:x="http://schemas.microsoft.com/winfx/2006/xaml"
    Title="Window1" Height="294" Width="479">
    <Grid>
        <UniformGrid Margin="32,22,35,68" Name="uniformGrid1" Rows="4" Columns="3">
            <Button Height="23" Name="button1" Width="75">1</Button>
            <Button Height="23" Name="button2" Width="75">2</Button>
            <Label Height="28" Name="label1" Width="120">3</Label>
            <Label Height="28" Name="label2" Width="120">4</Label>
            <Button Height="23" Name="button3" Width="75">5</Button>
            <Label Height="28" Name="label3" Width="120">6</Label>
            <Button Height="23" Name="button4" Width="75">7</Button>
            <Button Height="23" Name="button5" Width="75">8</Button>
            <CheckBox Height="16" Name="checkBox1" Width="120">9</CheckBox>
            <Label Height="28" Name="label4" Width="120">10</Label>
            <Label Height="28" Name="label5" Width="120">11</Label>
            <Label Height="28" Name="label6" Width="120">12</Label>
        </UniformGrid>
    </Grid>
</Window>
StackPanel
上下方向、もしくは左右方向に順に並べて配置するパネル。
コレもあまりインパクトはない。
「Orientation」プロパティで上下方向か、左右方向かを決定する。
<Window x:Class="WpfSample2.Window1"
    xmlns="http://schemas.microsoft.com/winfx/2006/xaml/presentation"
    xmlns:x="http://schemas.microsoft.com/winfx/2006/xaml"
    Title="Window1" Height="220" Width="208">
    <Grid>
        <StackPanel Margin="12" Name="stackPanel1" Orientation="Vertical">
            <Button Height="23" Name="button1" Width="75">Button</Button>
            <Button Height="23" Name="button2" Width="75">Button</Button>
            <CheckBox Height="16" Name="checkBox1" Width="120">CheckBox</CheckBox>
            <Label Height="28" Name="label1" Width="120">Label</Label>
            <Label Height="28" Name="label2" Width="120">Label</Label>
            <Button Height="23" Name="button3" Width="75">Button</Button>
        </StackPanel>
    </Grid>
</Window>
WrapPanel
縦、または横方向にアイテムを列挙して配置するが、ウィンドウサイズを変更したときに、自動で折り返して配置する。
かっこよくはないが、ウィンドウサイズ変更しないと作業できねーということにはならなそう。
単純なのでコードなし。
DockPanel
パネルに隣接する、上下左右に対してコンポーネントを配置する。

で、コード
<Window x:Class="WpfSample2.Window1"
    xmlns="http://schemas.microsoft.com/winfx/2006/xaml/presentation"
    xmlns:x="http://schemas.microsoft.com/winfx/2006/xaml"
    Title="Window1" Height="233" Width="289">
    <Grid>
        <DockPanel Margin="12" Name="dockPanel1" LastChildFill="False">
            <Button Height="23" Name="button1" Width="75" DockPanel.Dock="Left">Button</Button>
            <Button Height="23" Name="button2" Width="75" DockPanel.Dock="Right">Button</Button>
            <Button Height="23" Name="button3" Width="75" DockPanel.Dock="Top">Button</Button>
            <Button Height="23" Name="button4" Width="75" DockPanel.Dock="Bottom">Button</Button>
        </DockPanel>
    </Grid>
</Window>
とりあえず今日はここまで。