AngularJS をセットアップする
AngularJS とは
Google と OSS コミュニティで作成されるフロントエンドフレームワークです。
セットアップ
Angular のコマンドラインツールをまずインストールします。
npm install -g @angular/cli
プロジェクトを作成していきます。
ng new my-app で作成です。
$ ng new my-app
? Would you like to share pseudonymous usage data about this project with the Angular Team
at Google under Google's Privacy Policy at https://policies.google.com/privacy. For more
details and how to change this setting, see https://angular.io/analytics. No
Global setting: disabled
Local setting: No local workspace configuration file.
Effective status: disabled
? Would you like to add Angular routing? No
? Which stylesheet format would you like to use? CSS
...
質問には下記で設定しています
プロジェクトが出来上がったら npm run start
$ npm run start

> my-app@0.0.0 start
> ng serve

? Would you like to enable autocompletion? This will set up your terminal so pressing TAB while typing Angular CLI commands will show possible options and autocomplete arguments. (Enabling
 autocompletion will modify configuration files in your home directory.) Yes
Appended `source <(ng completion script)` to `C:\Users\azale\.bashrc`. Restart your terminal or run the following to autocomplete `ng` commands:

    source <(ng completion script)
✔ Browser application bundle generation complete.

Initial Chunk Files   | Names         |  Raw Size
vendor.js             | vendor        |   1.95 MB |
polyfills.js          | polyfills     | 328.93 kB |
styles.css, styles.js | styles        | 226.36 kB |
main.js               | main          |  45.98 kB |
runtime.js            | runtime       |   6.51 kB |

                      | Initial Total |   2.54 MB

Build at: 2023-05-25T13:02:39.178Z - Hash: 8a48f1dd49bbdda6 - Time: 7126ms

** Angular Live Development Server is listening on localhost:4200, open your browser on http://localhost:4200/ **


√ Compiled successfully.

恒例のコードリーディング
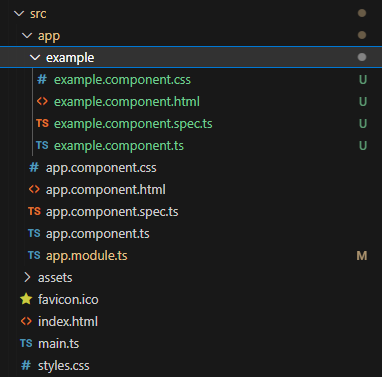
プロジェクト作成時点での構成はこんな感じ。

CSS と HTML/TS で構成されているようだ。
TS は TypeScript の事で、静的型付けの JavaScript として Microsoft が開発している言語だ。
根っこから見ていく訳だが、index.html は本気で見るものが無い。
<!doctype html>
<html lang="en">
<head>
  <meta charset="utf-8">
  <title>MyApp</title>
  <base href="/">
  <meta name="viewport" content="width=device-width, initial-scale=1">
  <link rel="icon" type="image/x-icon" href="favicon.ico">
</head>
<body>
  <app-root></app-root>
</body>
</html>
強いて言えば、app-root タグが一つあるだけ。
気を取り直して、main.ts を見てみるが、こっちも大したことは書いていない。
import { platformBrowserDynamic } from '@angular/platform-browser-dynamic';
import { AppModule } from './app/app.module';

platformBrowserDynamic().bootstrapModule(AppModule)
  .catch(err => console.error(err));
app.module を読み込んで起動する…それだけの様に見える。
あくまで起動部分という事だろう。
では app ディレクトリ配下を見ていく。
app.module.ts を開くと
import { NgModule } from '@angular/core';
import { BrowserModule } from '@angular/platform-browser';
import { AppComponent } from './app.component';

@NgModule({
  declarations: [
    AppComponent
  ],
  imports: [
    BrowserModule
  ],
  providers: [],
  bootstrap: [AppComponent]
})
export class AppModule { }
中身としては、app.component をモジュールのエントリポイントにするという定義だけだ。
しかしデコレータで定義をしていくとはなんとも癖のある感じだ…
app.component.ts を覗くと、これが実際の本体らしい。
import { Component } from '@angular/core';

@Component({
  selector: 'app-root',
  templateUrl: './app.component.html',
  styleUrls: ['./app.component.css']
})
export class AppComponent {
  title = 'my-app';
}
恐ろしく空っぽである。
title = 'my-app'; を画面にバインドするつもりなんだろうな…というのだけは予想できる。
しかしここまで空だと初見ではかなり戸惑う
テンプレートは長いので色々省略して
<div class="content" role="main">

  <!-- Highlight Card -->
  <div class="card highlight-card card-small">

    <svg id="rocket" xmlns="http://www.w3.org/2000/svg" width="101.678" height="101.678" viewBox="0 0 101.678 101.678">
      <title>Rocket Ship</title>
      <g id="Group_83" data-name="Group 83" transform="translate(-141 -696)">
        <circle id="Ellipse_8" data-name="Ellipse 8" cx="50.839" cy="50.839" r="50.839" transform="translate(141 696)" fill="#dd0031"/>
        <g id="Group_47" data-name="Group 47" transform="translate(165.185 720.185)">
          <path id="Path_33" data-name="Path 33" d="M3.4,42.615a3.084,3.084,0,0,0,3.553,3.553,21.419,21.419,0,0,0,12.215-6.107L9.511,30.4A21.419,21.419,0,0,0,3.4,42.615Z" transform="translate(0.371 3.363)" fill="#fff"/>
          <path id="Path_34" data-name="Path 34" d="M53.3,3.221A3.09,3.09,0,0,0,50.081,0,48.227,48.227,0,0,0,18.322,13.437c-6-1.666-14.991-1.221-18.322,7.218A33.892,33.892,0,0,1,9.439,25.1l-.333.666a3.013,3.013,0,0,0,.555,3.553L23.985,43.641a2.9,2.9,0,0,0,3.553.555l.666-.333A33.892,33.892,0,0,1,32.647,53.3c8.55-3.664,8.884-12.326,7.218-18.322A48.227,48.227,0,0,0,53.3,3.221ZM34.424,9.772a6.439,6.439,0,1,1,9.106,9.106,6.368,6.368,0,0,1-9.106,0A6.467,6.467,0,0,1,34.424,9.772Z" transform="translate(0 0.005)" fill="#fff"/>
        </g>
      </g>
    </svg>

    <span>{{ title }} app is running!</span>
なるほど、{{ 変数名 }} でバインドするらしい。
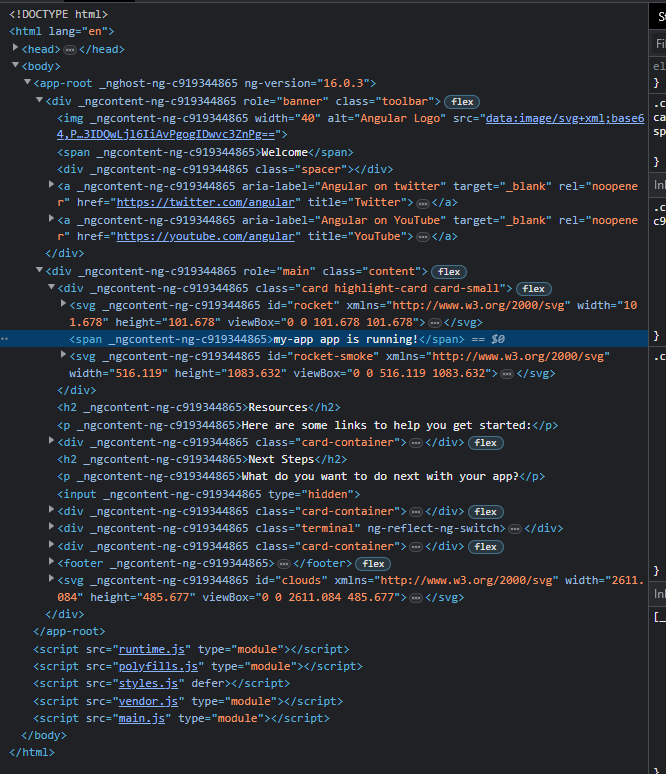
結果として出力されるタグも確認する。

こちらでも ShadowDOM は使わないご様子。
コンポーネントの追加
Angular はコンポーネントを自前で追加もできるが、コマンドから作成できるようだ。
$ ng generate component example
CREATE src/app/example/example.component.html (22 bytes)
CREATE src/app/example/example.component.spec.ts (566 bytes)
CREATE src/app/example/example.component.ts (206 bytes)
CREATE src/app/example/example.component.css (0 bytes)
UPDATE src/app/app.module.ts (400 bytes)

モジュールとコンポーネントは異なる概念のようだ…
example/example.component.ts を覗いてみると
import { Component } from '@angular/core';

@Component({
  selector: 'app-example',
  templateUrl: './example.component.html',
  styleUrls: ['./example.component.css']
})
export class ExampleComponent {

}
実に空っぽの定義、デフォルトで作成されるコンポーネントは モジュール名-コンポーネント名 で作成されるようだ。
example/example.component.html の中身はもっとシンプルで
<p>example works!</p>
実にシンプルだ。
コンポーネントの ShadowDOM 化は encapsulation: ViewEncapsulation.ShadowDom か…
早速 @Component に突っ込んでみる
import { Component, ViewEncapsulation } from '@angular/core';

@Component({
  selector: 'app-example',
  templateUrl: './example.component.html',
  styleUrls: ['./example.component.css'],
  encapsulation: ViewEncapsulation.ShadowDom,
})
export class ExampleComponent {
}
この状態で、app/aoo.component.html をこんな感じに書き換えた
<div class="content" role="main">
  <span>{{ title }} app is running!</span>
  <app-example></app-example>
</div>
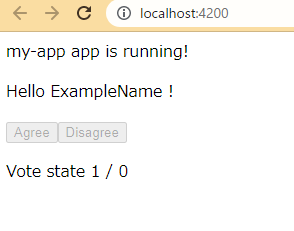
さあ結果は?

きちんと ShadowDOM するようになったね。
親から子にデータを渡すのは @Input 、逆に子→親の通知は、イベントもしくは @Output するらしい
example.component.ts をこんな風に書き換えて
import { Component, ViewEncapsulation, Input, Output, EventEmitter } from '@angular/core';

@Component({
  selector: 'app-example',
  templateUrl: './example.component.html',
  styleUrls: ['./example.component.css'],
  encapsulation: ViewEncapsulation.ShadowDom,
})
export class ExampleComponent {
  @Input('name') nameValue : String = 'John Doe';

  @Output() voted = new EventEmitter<boolean>();
  didVote = false;

  vote(agreed: boolean) {
    this.voted.emit(agreed);
    this.didVote = true;
  }
}
画面 example.component.html をこんな風に設定する
<p>Hello {{nameValue}} !</p>
<button type="button" (click)="vote(true)"  [disabled]="didVote">Agree</button>
<button type="button" (click)="vote(false)" [disabled]="didVote">Disagree</button>
親コンポーネントは、vote のイベントを待ち受けるようにする。
app.component.ts は
import { Component } from '@angular/core';

@Component({
  selector: 'app-root',
  templateUrl: './app.component.html',
  styleUrls: ['./app.component.css']
})
export class AppComponent {
  title = 'my-app';
  testUser = 'ExampleName';

  // 以下追加
  agreed = 0;
  disagreed = 0;
  onVoted(agreed: boolean) {
    if (agreed) {
      this.agreed++;
    } else {
      this.disagreed++;
    }
  }
}
で、app.component.html では
<div class="content" role="main">

  <span>{{ title }} app is running!</span>
  <app-example [name]="testUser" (voted)="onVoted($event)"></app-example>

  <p>Vote state {{agreed}} / {{disagreed}}</p>
</div>

なるほどこんな感じか。
リリース
npm run build コマンドを実行すれば、dist ディレクトリに静的ファイルが出力される。
構成は Vue の方がシンプルだが、まぁ良いのではなかろうか?

ドキュメント
ドキュメントは日本語があるのはありがたいね。
感想
Angular は独自の記法が大分多い一方、かなり細かく挙動制御が出来そうだ。
柔軟性が高いというよりかは、CoC を取り入れつつ、オプションが豊富なのだろう。
学習コストだけでいえば多分下記の様な印象。
React > LWC > Vue > Angular
LWC は標準 HTML に極力準拠しようとしている所が確かにあるので、独自路線を突っ走る REACT とは学習的にはタメを張る覚えやすさではないかな…。
ただし、慣れと大規模化を考えると、LWC と Angular は捨てがたい…